Builder 模式是一步一步创建一个复杂对象的创建型模式,它允许用户在不知道内部构建细节的情况下,可以更精确的控制对象的构造流程。该模式是为了将构建复杂对象的过程和它的部件解耦,使得构建过程和部件的表示隔离开来。本文将简要介绍 Builder 模式的概念、使用场景、以及 Android 源码中 Builder 模式的应用。
Builder 模式定义
定义:将一个复杂对象的构建与它的表示分离,使得同样的构建过程可以创建不同的表示。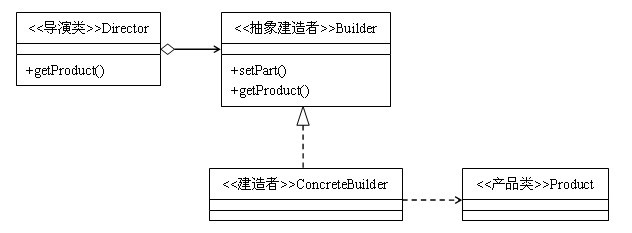
Builder 模式使用场景
- 相同的方法,不同的执行顺序,产生不同的事件结果时,可以采用建造者模式。
- 多个部件或零件,都可以装配到一个对象中,但是产生的运行结果又不相同时,则可以使用该模式。
- 产品类非常复杂,或者产品类中的调用顺序不同产生了不同的效能,这个时候使用建造者模式是非常合适。
- 当初始化一个对象特别复杂,如参数多,且很多参数都具有默认值时。
- 在对象创建过程中会使用到系统中的一些其它对象,这些对象在产品对象的创建过程中不易得到时,也可以采用建造者模式封装该对象的创建过程。该种场景,只能是一个补偿方法,因为一个对象不容易获得,而在设计阶段竟然没有发觉,而要通过创建者模式柔化创建过程,本身已经违反设计最初目标。
Builder 模式实例
1 | class Product { |
上述代码,通过具体的 ConcreteBuilder 来构建 Product 对象, Director 封装了构造复杂对象的具体过程,对外隐藏了构建细节,但是一般情况下在现实开发过程中, Director 常常被忽略,而直接使用一个 Builder 来进行对象的组装,这个 Builder 通常为链式调用,通过这种形式,结构更加简单,可定制性更强。
Android 源码中的 Builder 模式应用
在 Android 源码中,最明显的使用 Builder 模式的就是 AlertDialog 的构建。下面是一段 AlertDialog 的常见使用示例:1
2
3
4
5
6
7new AlertDialog.Builder(self)
.setTitle("请输入")
.setIcon(android.R.drawable.ic_dialog_info)
.setView(new EditText(self))
.setPositiveButton("确定", null)
.setNegativeButton("取消", null)
.show();
可以看到 AlertDialog 对于 Builder 模式的应用就省略了 Director 。这也是 Builder 模式的常见使用形式。1
2
3
4
5
6
7
8
9
10
11
12
13
14
15
16
17
18
19
20
21
22
23
24
25
26
27
28
29
30
31
32
33
34
35
36
37
38
39
40
41
42
43
44
45
46
47
48
49
50
51
52
53
54
55
56
57
58
59
60
61
62
63
64
65
66
67
68
69
70
71
72
73
74
75
76
77
78
79
80
81
82
83
84
85
86
87
88
89
90
91
92
93
94
95
96
97
98
99
100
101
102
103
104
105
106
107
108
109
110
111
112
113
114
115
116
117
118
119
120
121
122
123
124
125
126
127
128
129
130
131
132
133
134
135
136
137
138
139
140
141
142
143
144
145
146
147
148
149
150
151
152
153
154public class AlertDialog extends Dialog implements DialogInterface {
private AlertController mAlert;
//.....
protected AlertDialog(Context context, boolean cancelable, OnCancelListener cancelListener) {
super(context, resolveDialogTheme(context, 0));
mWindow.alwaysReadCloseOnTouchAttr();
setCancelable(cancelable);
setOnCancelListener(cancelListener);
mAlert = new AlertController(context, this, getWindow());
}
//.............
public void setTitle(CharSequence title) {
super.setTitle(title);
mAlert.setTitle(title);
}
public void setCustomTitle(View customTitleView) {
mAlert.setCustomTitle(customTitleView);
}
public void setMessage(CharSequence message) {
mAlert.setMessage(message);
}
public void setView(View view) {
mAlert.setView(view);
}
public void setView(View view, int viewSpacingLeft, int viewSpacingTop, int viewSpacingRight,
int viewSpacingBottom) {
mAlert.setView(view, viewSpacingLeft, viewSpacingTop, viewSpacingRight, viewSpacingBottom);
}
void setButtonPanelLayoutHint(int layoutHint) {
mAlert.setButtonPanelLayoutHint(layoutHint);
}
public void setButton(int whichButton, CharSequence text, Message msg) {
mAlert.setButton(whichButton, text, null, msg);
}
public void setButton(int whichButton, CharSequence text, OnClickListener listener) {
mAlert.setButton(whichButton, text, listener, null);
}
//..........
public void setIcon(int resId) {
mAlert.setIcon(resId);
}
public void setIcon(Drawable icon) {
mAlert.setIcon(icon);
}
protected void onCreate(Bundle savedInstanceState) {
super.onCreate(savedInstanceState);
mAlert.installContent();
}
public boolean onKeyDown(int keyCode, KeyEvent event) {
if (mAlert.onKeyDown(keyCode, event)) return true;
return super.onKeyDown(keyCode, event);
}
public boolean onKeyUp(int keyCode, KeyEvent event) {
if (mAlert.onKeyUp(keyCode, event)) return true;
return super.onKeyUp(keyCode, event);
}
public static class Builder {
private final AlertController.AlertParams P;
private int mTheme;
public Builder(Context context, int theme) {
P = new AlertController.AlertParams(new ContextThemeWrapper(
context, resolveDialogTheme(context, theme)));
mTheme = theme;
}
public Context getContext() {
return P.mContext;
}
public Builder setTitle(int titleId) {
P.mTitle = P.mContext.getText(titleId);
return this;
}
public Builder setTitle(CharSequence title) {
P.mTitle = title;
return this;
}
public Builder setCustomTitle(View customTitleView) {
P.mCustomTitleView = customTitleView;
return this;
}
public Builder setMessage(int messageId) {
P.mMessage = P.mContext.getText(messageId);
return this;
}
//......
public Builder setView(View view) {
P.mView = view;
P.mViewLayoutResId = 0;
P.mViewSpacingSpecified = false;
return this;
}
public Builder setView(View view, int viewSpacingLeft, int viewSpacingTop,
int viewSpacingRight, int viewSpacingBottom) {
P.mView = view;
P.mViewLayoutResId = 0;
P.mViewSpacingSpecified = true;
P.mViewSpacingLeft = viewSpacingLeft;
P.mViewSpacingTop = viewSpacingTop;
P.mViewSpacingRight = viewSpacingRight;
P.mViewSpacingBottom = viewSpacingBottom;
return this;
}
public AlertDialog create() {
final AlertDialog dialog = new AlertDialog(P.mContext, mTheme, false);
P.apply(dialog.mAlert);
dialog.setCancelable(P.mCancelable);
if (P.mCancelable) {
dialog.setCanceledOnTouchOutside(true);
}
dialog.setOnCancelListener(P.mOnCancelListener);
dialog.setOnDismissListener(P.mOnDismissListener);
if (P.mOnKeyListener != null) {
dialog.setOnKeyListener(P.mOnKeyListener);
}
return dialog;
}
public AlertDialog show() {
AlertDialog dialog = create();
dialog.show();
return dialog;
}
}
}
可以看到 AlertDialog 有静态内部类 Builder ,构造 AlertDialog 时先通过 AlertDialog.Builder set title、message、button 等参数,这些参数都存储在 AlertController.AlertParams 中, AlertController.AlertParams 中包含了与 AlertDialog 视图对应的成员变量,在调用 AlertDialog.Builder 的 create 方法时会创建 AlertDialog ,并且将 AlertController.AlertParams 中的参数应用到 AlertDialog 。具体的 AlertDialog 源码细节大家可以参考其他文章,这里只介绍 AlertDialog 中 Builder 模式的应用。
总结
Builder 模式在 Android 开发中非常常见,例如比较流行的图片加载框架,例如:univser-imageloader 、 picasso 和 Glide 的构造都使用了 Builder 模式。这种模式避免了过多的 setter 方法, Builder 模式比较常见的使用方式是调用实现。