AsyncTask 是Google官方提供的供开发者简易使用UI线程的一种解决方案。通过使用AsyncTask,我们可以在后台进行数据操作,然后将结果发布到UI线程,而且
免了使用Thread和Handler。这篇文章将分析AsyncTask的源码,以探寻其实现原理。
AsyncTask是Thread和Handler的一个帮助类,它也只能做一些short operations(自己理解,我也不会翻)。如果需要Thread运行很长时间的话还是建议使用 java.util.concurrent 包下的API,例如:Executor、ThreadPoolExecutor、FutureTask。AsyncTask 简单介绍就到这里,对于 AsyncTask 的使用还不熟悉的 移步这里。
线程池配置
1 | private static final int CPU_COUNT = Runtime.getRuntime().availableProcessors();//根据CPU大小来配置核心的线程 |
可以看到以上代码主要构造了两个线程池:THREAD_POOL_EXECUTOR、SERIAL_EXECUTOR,其中 THREAD_POOL_EXECUTOR 是正常的一个线程池 ,其构造参数前面的 代码块中已经解释过了。对于线程池的构造还不熟悉的同学可以移步这里。另一个线程池SERIAL_EXECUTOR, 从名字上可以看出其是一个串行线程池,对于AsyncTask熟悉的同学应该知道,AsyncTask的默认实现是串行的,那么我们首先看一看 SERIAL_EXECUTOR 是怎么 实现的。
SerialExecutor 的实现原理
1 | private static class SerialExecutor implements Executor { |
以上就是SerialExecutor的实现原理,接下来我们看一看构造函数是怎么实现的。1
2
3
4
5
6
7
8
9
10
11
12
13
14
15
16
17
18
19
20
21
22
23
24
25
26
27
28
29
30/**
* Creates a new asynchronous task. This constructor must be invoked on the UI thread.
*/
public AsyncTask() {
mWorker = new WorkerRunnable<Params, Result>() {
public Result call() throws Exception {
mTaskInvoked.set(true);
Process.setThreadPriority(Process.THREAD_PRIORITY_BACKGROUND);
//noinspection unchecked
return postResult(doInBackground(mParams));
}
};
mFuture = new FutureTask<Result>(mWorker) {
protected void done() {
try {
postResultIfNotInvoked(get());
} catch (InterruptedException e) {
android.util.Log.w(LOG_TAG, e);
} catch (ExecutionException e) {
throw new RuntimeException("An error occured while executing doInBackground()",
e.getCause());
} catch (CancellationException e) {
postResultIfNotInvoked(null);
}
}
};
}
可以看到以上代码的注释中有一句很重要的话, AsyncTask 必须在UI线程进行构造。那么这是为什么呢?
默认情况下,Handler会使用当前线程的Looper,如果你的AsyncTask是在子线程创建的,那么很不幸,你的onPreExecute和onPostExecute并非在UI线程执行
,而是被Handler post到创建它的那个线程执行;如果你在这两个线程更新了UI,那么直接导致崩溃。这也是大家口口相传的 AsyncTask 必须在主线程
创建的原因。另外,AsyncTask里面的这个Handler是一个静态变量,也就是说它是在类加载的时候创建的;如果在你的APP进程里面,以前从来没有使用过AsyncTask,然后
在子线程使用AsyncTask的相关变量,那么导致静态Handler初始化,如果在API 16以下,那么会出现上面同样的问题;这就是AsyncTask必须在主线程初始化
的原因。
接下来我们看一看execute方法和executeOnExecutor方法。1
2
3
4
5
6
7
8
9
10
11
12
13
14
15
16
17
18
19
20
21
22
23
24
25
26
27
28
29
30
31
32
33
34
35
36
37
38
39
40
41
42
43
44
45
46
private static volatile Executor sDefaultExecutor = SERIAL_EXECUTOR;

public final AsyncTask<Params, Progress, Result> execute(Params... params) {
       return executeOnExecutor(sDefaultExecutor, params);
   }

   public final AsyncTask<Params, Progress, Result> executeOnExecutor(Executor exec,
           Params... params) {
       if (mStatus != Status.PENDING) {
           switch (mStatus) {
               case RUNNING:
                   throw new IllegalStateException("Cannot execute task:"
                           + " the task is already running.");
               case FINISHED:
                   throw new IllegalStateException("Cannot execute task:"
                           + " the task has already been executed "
                           + "(a task can be executed only once)");
           }
       }

       mStatus = Status.RUNNING;

       onPreExecute();

       mWorker.mParams = params;
       exec.execute(mFuture);

       return this;
   }

   public enum Status {
       /**
        * Indicates that the task has not been executed yet.
        */
       PENDING,
       /**
        * Indicates that the task is running.
        */
       RUNNING,
       /**
        * Indicates that {@link AsyncTask#onPostExecute} has finished.
        */
       FINISHED,
   }
注意以上两个方法都必须在UI线程执行。可以看到execute最后也是调用了executeOnExecutor方法,其中的线程池当然是 SERIAL_EXECUTOR 串行线程池,这 也就是为什么说默认情况下 AsyncTask 是串行执行的,为了进行并行计算则需要调用executeOnExecutor方法。可以看到 AsyncTask 有三个状态,如果当前 AsyncTask 已经运行过则会抛出异常,这也就是 AsyncTask 只能执行一次的原因。在这个方法里也会调用onPreExecute() 方法,也就是说这个方法会执行在 UI线程。 最后会调用exec.execute(mFuture); 从构造方法中可以看到最后调用到了 postResultIfNotInvoked 方法,postResultIfNotInvoked 又调用了 postResult 方法,下面我们就看看 postResult 方法。
消息的处理
1 | private Result postResult(Result result) { |
可以看到 postResult 方法也就是通过Handler发送了一条消息,在Handler 中根据消息的不同调用不同的方法,其中会调用到 onProgressUpdate 方法,这也 就是onProgressUpdate 执行在UI线程的原因。至此我们可以看到, 实现AsyncTask 所需要override的方法,都得到了调用。
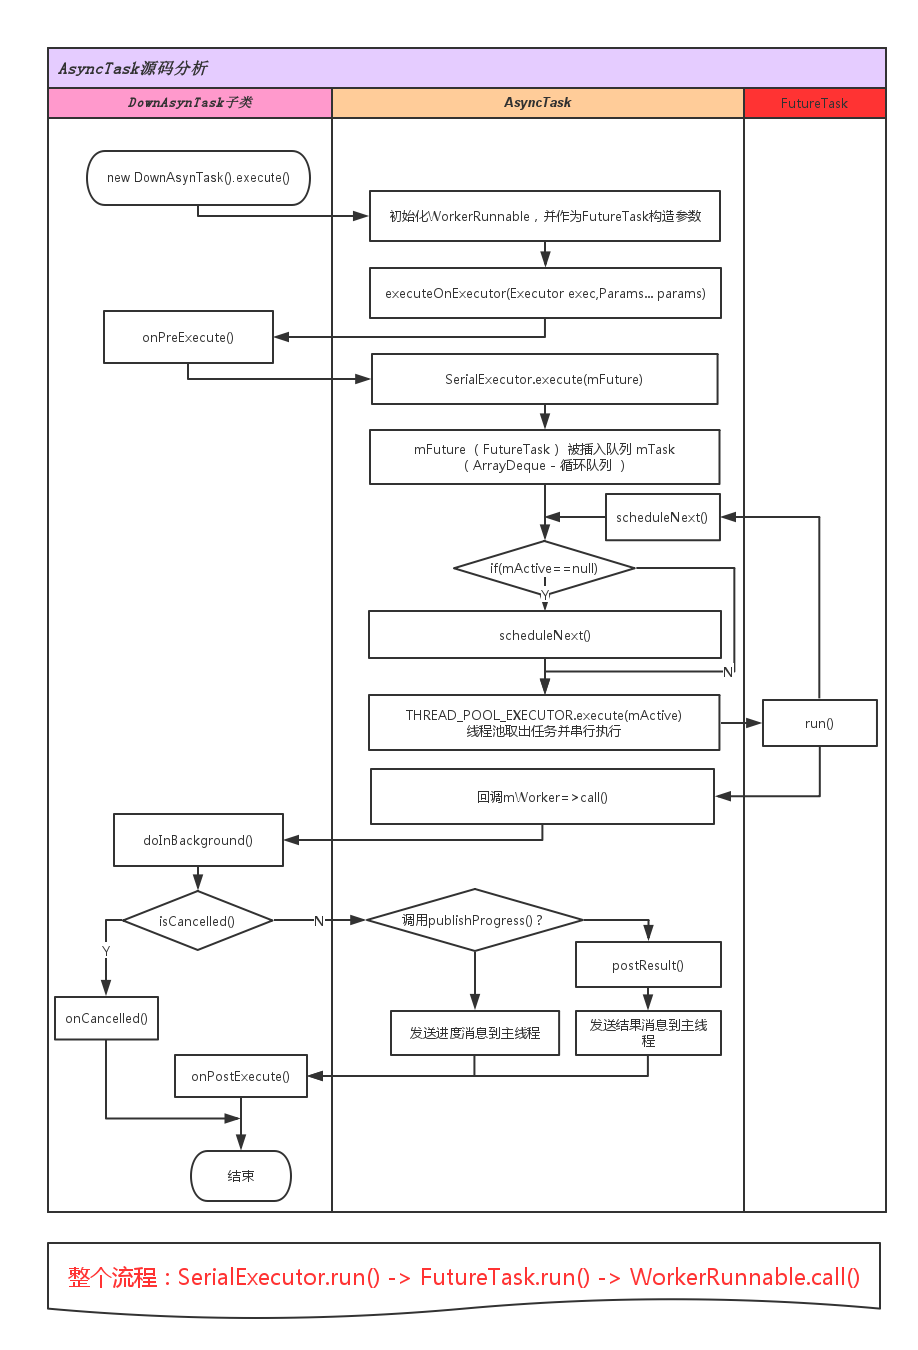
最后再放一张流程图。
使用AsyncTask需要注意的地方
- AsyncTask的类必须在UI线程加载(从4.1开始系统会帮我们自动完成)
- AsyncTask对象必须在UI线程创建
- execute方法必须在UI线程调用
- 不要在你的程序中去直接调用onPreExecute(), onPostExecute, doInBackground, onProgressUpdate方法
- 一个AsyncTask对象只能执行一次,即只能调用一次execute方法,否则会报运行时异常
- AsyncTask不是被设计为处理耗时操作的,耗时上限为几秒钟,如果要做长耗时操作,强烈建议你使用Executor,ThreadPoolExecutor以及FutureTask
在1.6之前,AsyncTask是串行执行任务的,1.6的时候AsyncTask开始采用线程池里处理并行任务,但是从3.0开始,为了避免AsyncTask所带来的并发错误,
AsyncTask 又采用一个线程来串行执行任务