Handler消息传递机制是Android系统中一个非常优秀的设计,Handler机制在我们的日常开发中接触的也非常多,相信大家已经用的很熟练了,这篇文章,就带大家通过源码了解一下,Handler的底层实现原理。
Handler源码探析
首先我们看一下,Handler类的注释中对于Handler的描述;1
2
3
4
5
6
7
8
9
10
11
12/**
*A Handler allows you to send and process {@link Message} and Runnable
* objects associated with a thread's {@link MessageQueue}. Each Handler
* instance is associated with a single thread and that thread's message
* queue. When you create a new Handler, it is bound to the thread /
* message queue of the thread that is creating it -- from that point on,
* it will deliver messages and runnables to that message queue and execute
* them as they come out of the message queue.
*
* 大意是说Handler可以用来发送和处理关联到线程的消息和Runnable。每一个线程都被关联到一个线程和线程上的MessageQueue。
* 当你创建一个新Handler的时候,它就会被绑定到线程和线程上的MessageQueue,它会交付Message和Runable给MessageQueue,然后执行。
*/
有了上面的注释,那么我们就先关注一下Handler的构造方法。Handler有几个重载的构造方法,但是最终都调用了以下构造方法。
1 | public Handler(Callback callback, boolean async) { |
可以看出在新建Handler时必须要有Looper的存在,因为在主线程已经默认为我们创建了Looper,所以在主线程创建Handler不需要关注Looper的创建,但是在子线程若要创建Handler则必须先调用Looper.prepare();进行初始化Looper。可以看一下Looper.prepare();到底做了什么。
1 | public static void prepare() { |
可以看到Looper是由ThreadLocal进行维护的,即每一个线程具有不同的Looper,对于ThreadLocal不熟悉的同学,可以查阅其他资料。在下面还有一个prepareMainLooper();方法,这个方法就是专为主线程创建Looper的。
大家可以自行查阅ActivityThread的main方法,这也是Android程序的入口,在main、方法里面有Looper.prepareMainLooper();这样一句代码,就是用来初始化Looper的。
到这里Handler和Looper都有了那么MessageQueue是在哪里初始化的呢?我们跟进sThreadLocal.set(new Looper(quitAllowed));这句代码,可以看到在Looper的构造方法中新建了MessageQueue。
到这里我们明白了,新建了Handler之后它会和所在的线程和线程的MessageQueue绑定。注意:在子线程新建Handler之前要先调用Looper.prepare();
1 | private Looper(boolean quitAllowed) { |
在了解了Handler的初始化过程后我们再关注一下Handler的sendMessage()、sendMessageDelayed()、post()、postDelayed()方法。从源码可以看到这几个方法最终都调用了sendMessageAtTime(Message msg, long uptimeMillis)方法。
所以我们先看一下sendMessageAtTime(Message msg, long uptimeMillis)方法。1
2
3
4
5
6
7
8
9
10
11
12
13
14
15
16
17
18
19public boolean sendMessageAtTime(Message msg, long uptimeMillis) {
MessageQueue queue = mQueue;
if (queue == null) {
RuntimeException e = new RuntimeException(
this + " sendMessageAtTime() called with no mQueue");
Log.w("Looper", e.getMessage(), e);
return false;
}
return enqueueMessage(queue, msg, uptimeMillis);
}
private boolean enqueueMessage(MessageQueue queue, Message msg, long uptimeMillis) {
msg.target = this;
if (mAsynchronous) {
msg.setAsynchronous(true);
}
return queue.enqueueMessage(msg, uptimeMillis);
}
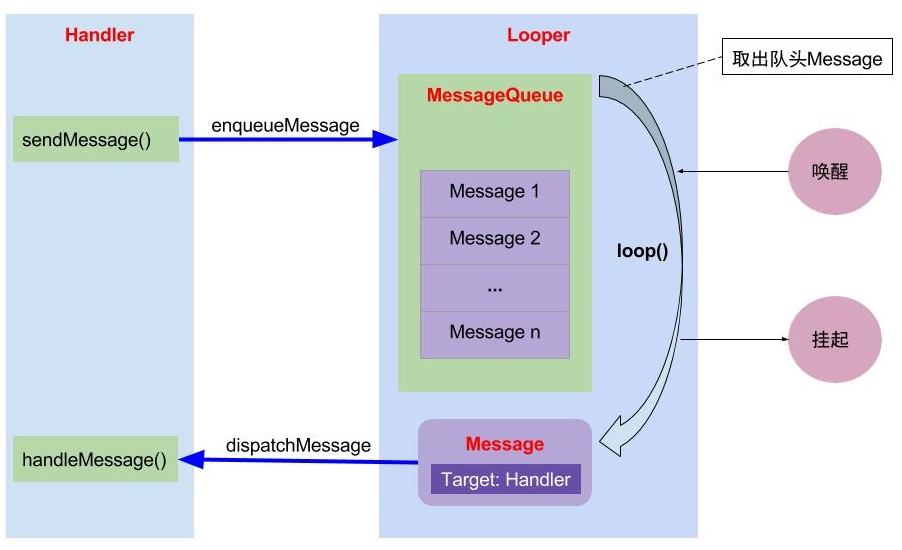
可以看到,最终调用了MessageQueue的enqueueMessage方法,这个方法我们就不跟进去了,虽然MessageQueue叫Queue,其实MessageQueue是用链表实现的,所以这里就是一个链表的插入操作。
可以看到,在Handler发送了Message和Runable之后只是将消息插入到了MessageQueue的尾部,并没有做其他的事情。顺便说一句,post()、postDelayed()在Handler中最后都转化为了sendMessage(),具体是怎么做的大家可以查阅其他资料或源码,
这里就不做解释了,本文主要是梳理Handler的执行流程,对于一些细节不做讨论。
到这里总结一下。新建Handler时会绑定Handler到当前线程和线程的MessageQueue,handler发了消息之后就是将消息插到当前线程的MessageQueue的尾部。
Looper源码探析
这一节我们查阅Looper源码,看一看Looper做了什么。
Looper的prepare()方法我们已经了解过了,这里我们可以查看Looper的核心代码即loop方法。
1 | /** |
首先从注释中看到,loop方法是执行此线程的MessageQueue中的消息,并且让我们再退出时调用quit方法结束掉loop。可以看到,loop方法是一个死循环,它在不断的拿出当前线程的MessageQueue的消息,只有在调用了quit方法之后,去除的消息为null之后loop方法会停止,所以我们在用消息处理完之后要调用quit方法。
可以看到,在loop方法中的msg.target.dispatchMessage(msg);在loop方法中拿到message之后,调用了message target的dispatchMessage方法,其实在Message类中可以看到这里的target就是Handler,即在Looper的loop方法中又把消息传给了Handler处理,到这里我们就明白了为什么要在继承Handler的时候要实现handleMessage方法,因为最终还是由handler处理消息的。
到这里我们就可以画出Handler消息机制的执行处理流程图了。